> ## Documentation Index
> Fetch the complete documentation index at: https://docs.lerian.studio/llms.txt
> Use this file to discover all available pages before exploring further.
# Manage the IP allowlist in the Console
> Add trusted addresses, choose whether the list applies to Console access, API access, or both, and deactivate it from the Security page of Lerian Console.
This guide shows how to manage the [IP allowlist](/en/platform/access-manager/features/ip-allowlist/overview) from the Console. You add addresses, choose where the list applies, and deactivate it when you no longer need it.
These flags apply to BYOC deployments only. On Lerian Cloud, Lerian manages them for you. The Security section appears only when your operator enabled it with `NEXT_PUBLIC_SECURITY_TAB_ENABLED=true`. The **API access** checkbox appears only with `NEXT_PUBLIC_SECURITY_API_SCOPE_ENABLED=true`. See [Deployment requirements](/en/platform/access-manager/features/ip-allowlist/deployment).
## Before you start
***
You need the `security` permission with the `get` action to open the page and the `put` action to change the list. Lerian's default administrator role has both. Without `get`, the page shows "You are not authorized to access this page."
Know the address you connect from. The Console shows it to you in several dialogs and in the **Add my IP** button. If you connect through a VPN or a corporate proxy, the address you see is the address of that VPN or proxy.
## Open the IP allowlist tab
***
Click the gear icon () in the top navigation bar.
Select **Security** in the Settings sidebar. The page title is "Security". The subtitle reads "Control how people sign in and where the platform can be reached from."
The page opens on the **Single Sign-On** tab. Select the **IP allowlist** tab. You can also open the path `/settings/security?tab=ip-allowlist` directly.
 ## Read the page
***
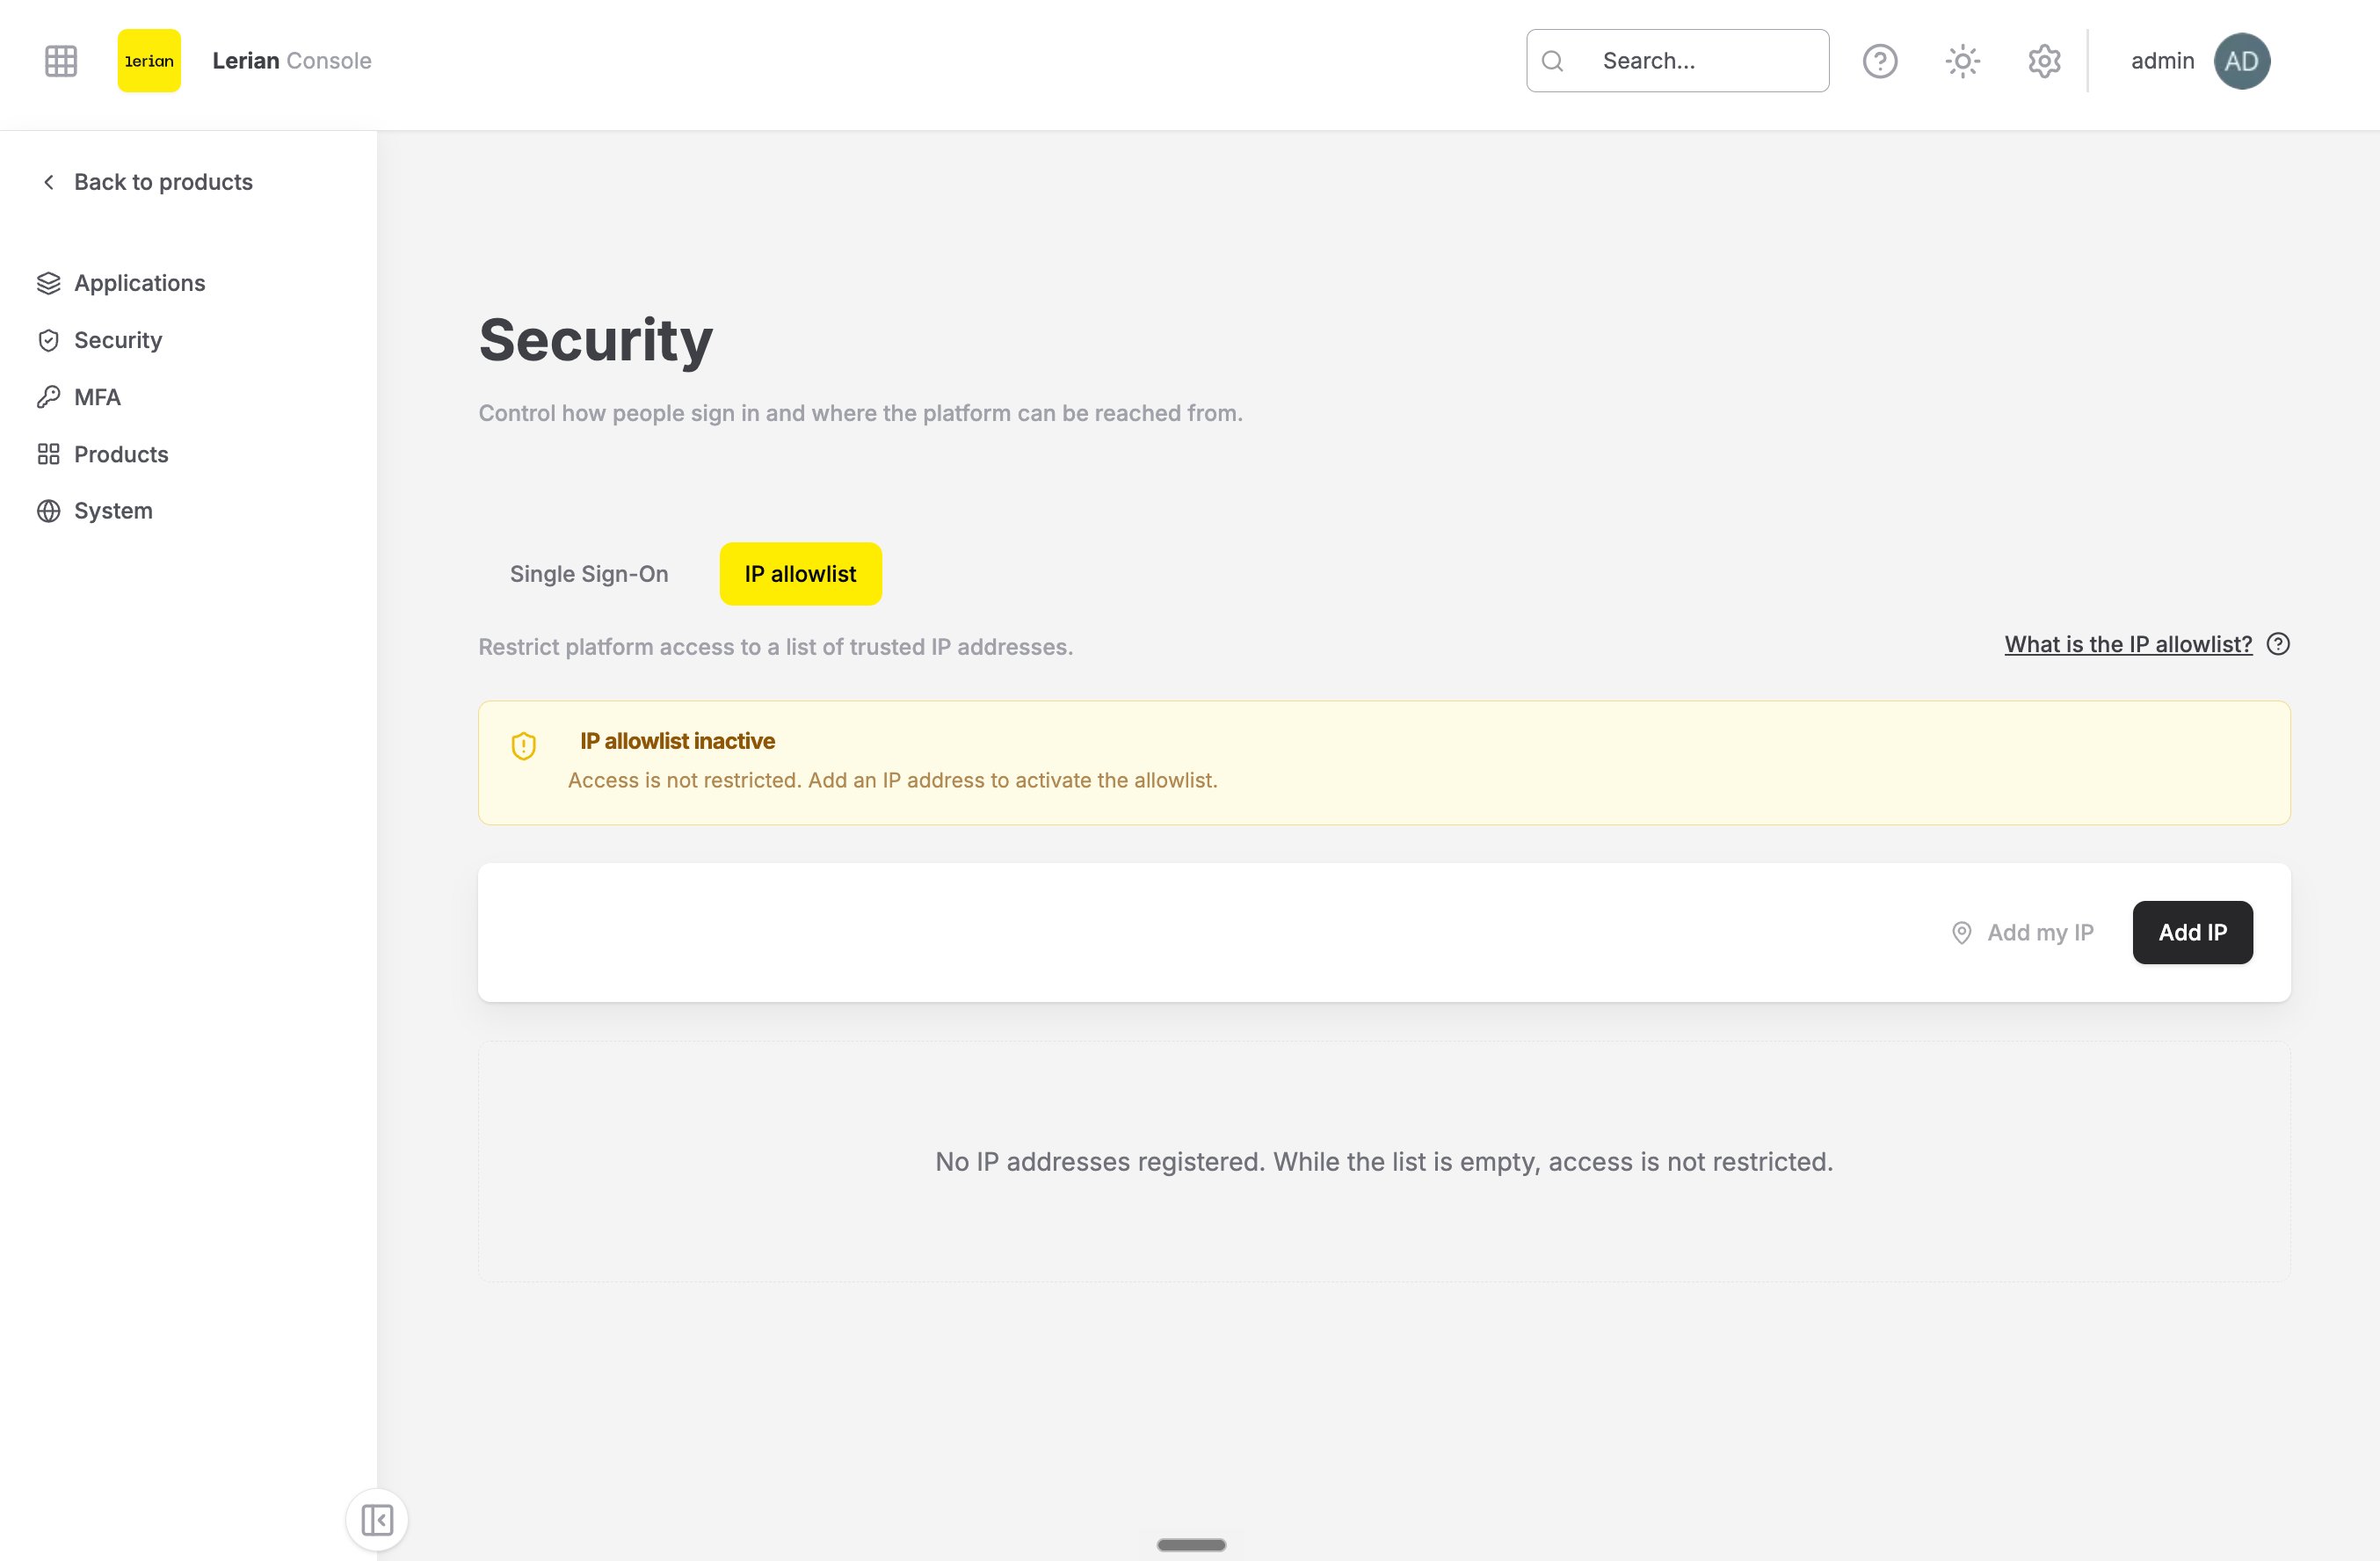
The tab subtitle reads "Restrict platform access to a list of trusted IP addresses." A collapsible section, "What is the IP allowlist?", explains the feature in a few lines.
A status banner tells you whether the list is enforced right now:
| Banner | Color | Description shown |
| --------------------- | ----- | -------------------------------------------------------------------------------------------------------- |
| IP allowlist inactive | Amber | "Access is not restricted. Add an IP address to activate the allowlist." |
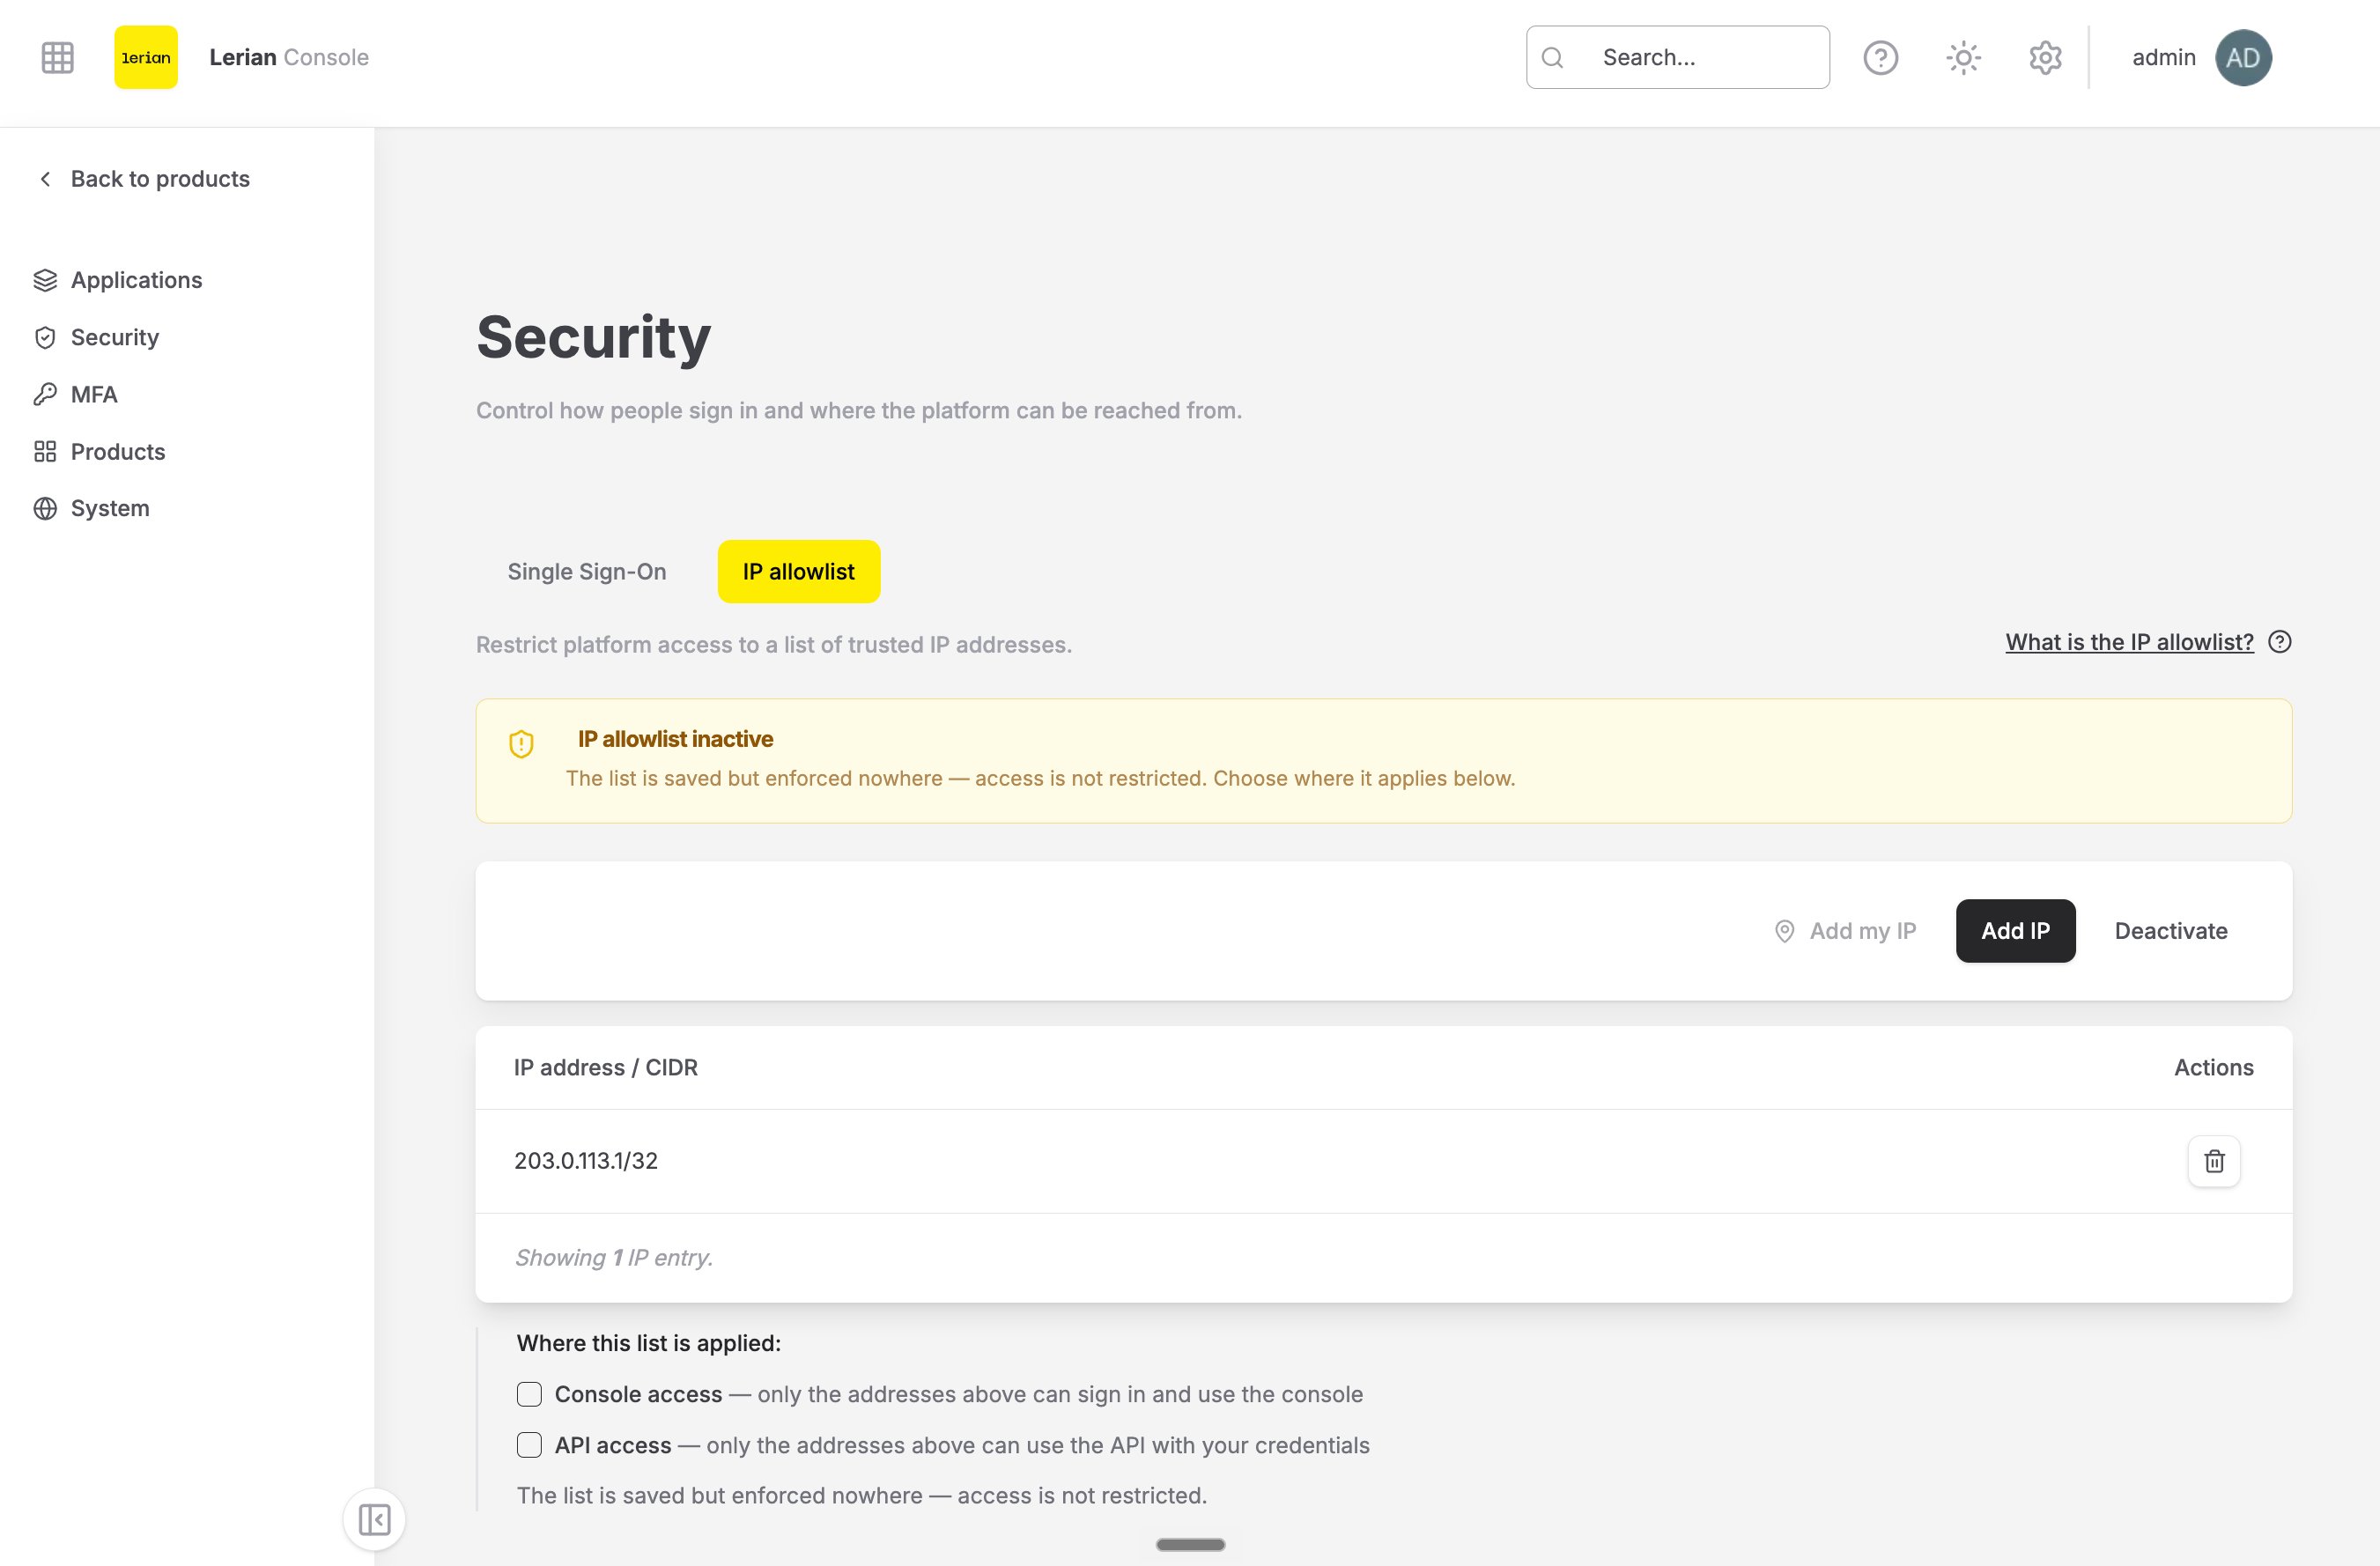
| IP allowlist inactive | Amber | "The list is saved but enforced nowhere — access is not restricted. Choose where it applies below." |
| IP allowlist active | Green | "Only the IP addresses below can sign in and use the console. API access is not restricted." |
| IP allowlist active | Green | "Only the IP addresses below can reach the API with your credentials. Console access is not restricted." |
| IP allowlist active | Green | "Only the IP addresses below can sign in to the console or reach the API with your credentials." |
Three buttons sit above the list:
* **Add my IP** adds the address you are connected from. When the Console cannot determine it, the button is disabled with the tooltip "Your IP address could not be determined."
* **Add IP** opens a side sheet where you type an address or a range.
* **Deactivate** appears only when the list has at least one entry.
## Add an address
***
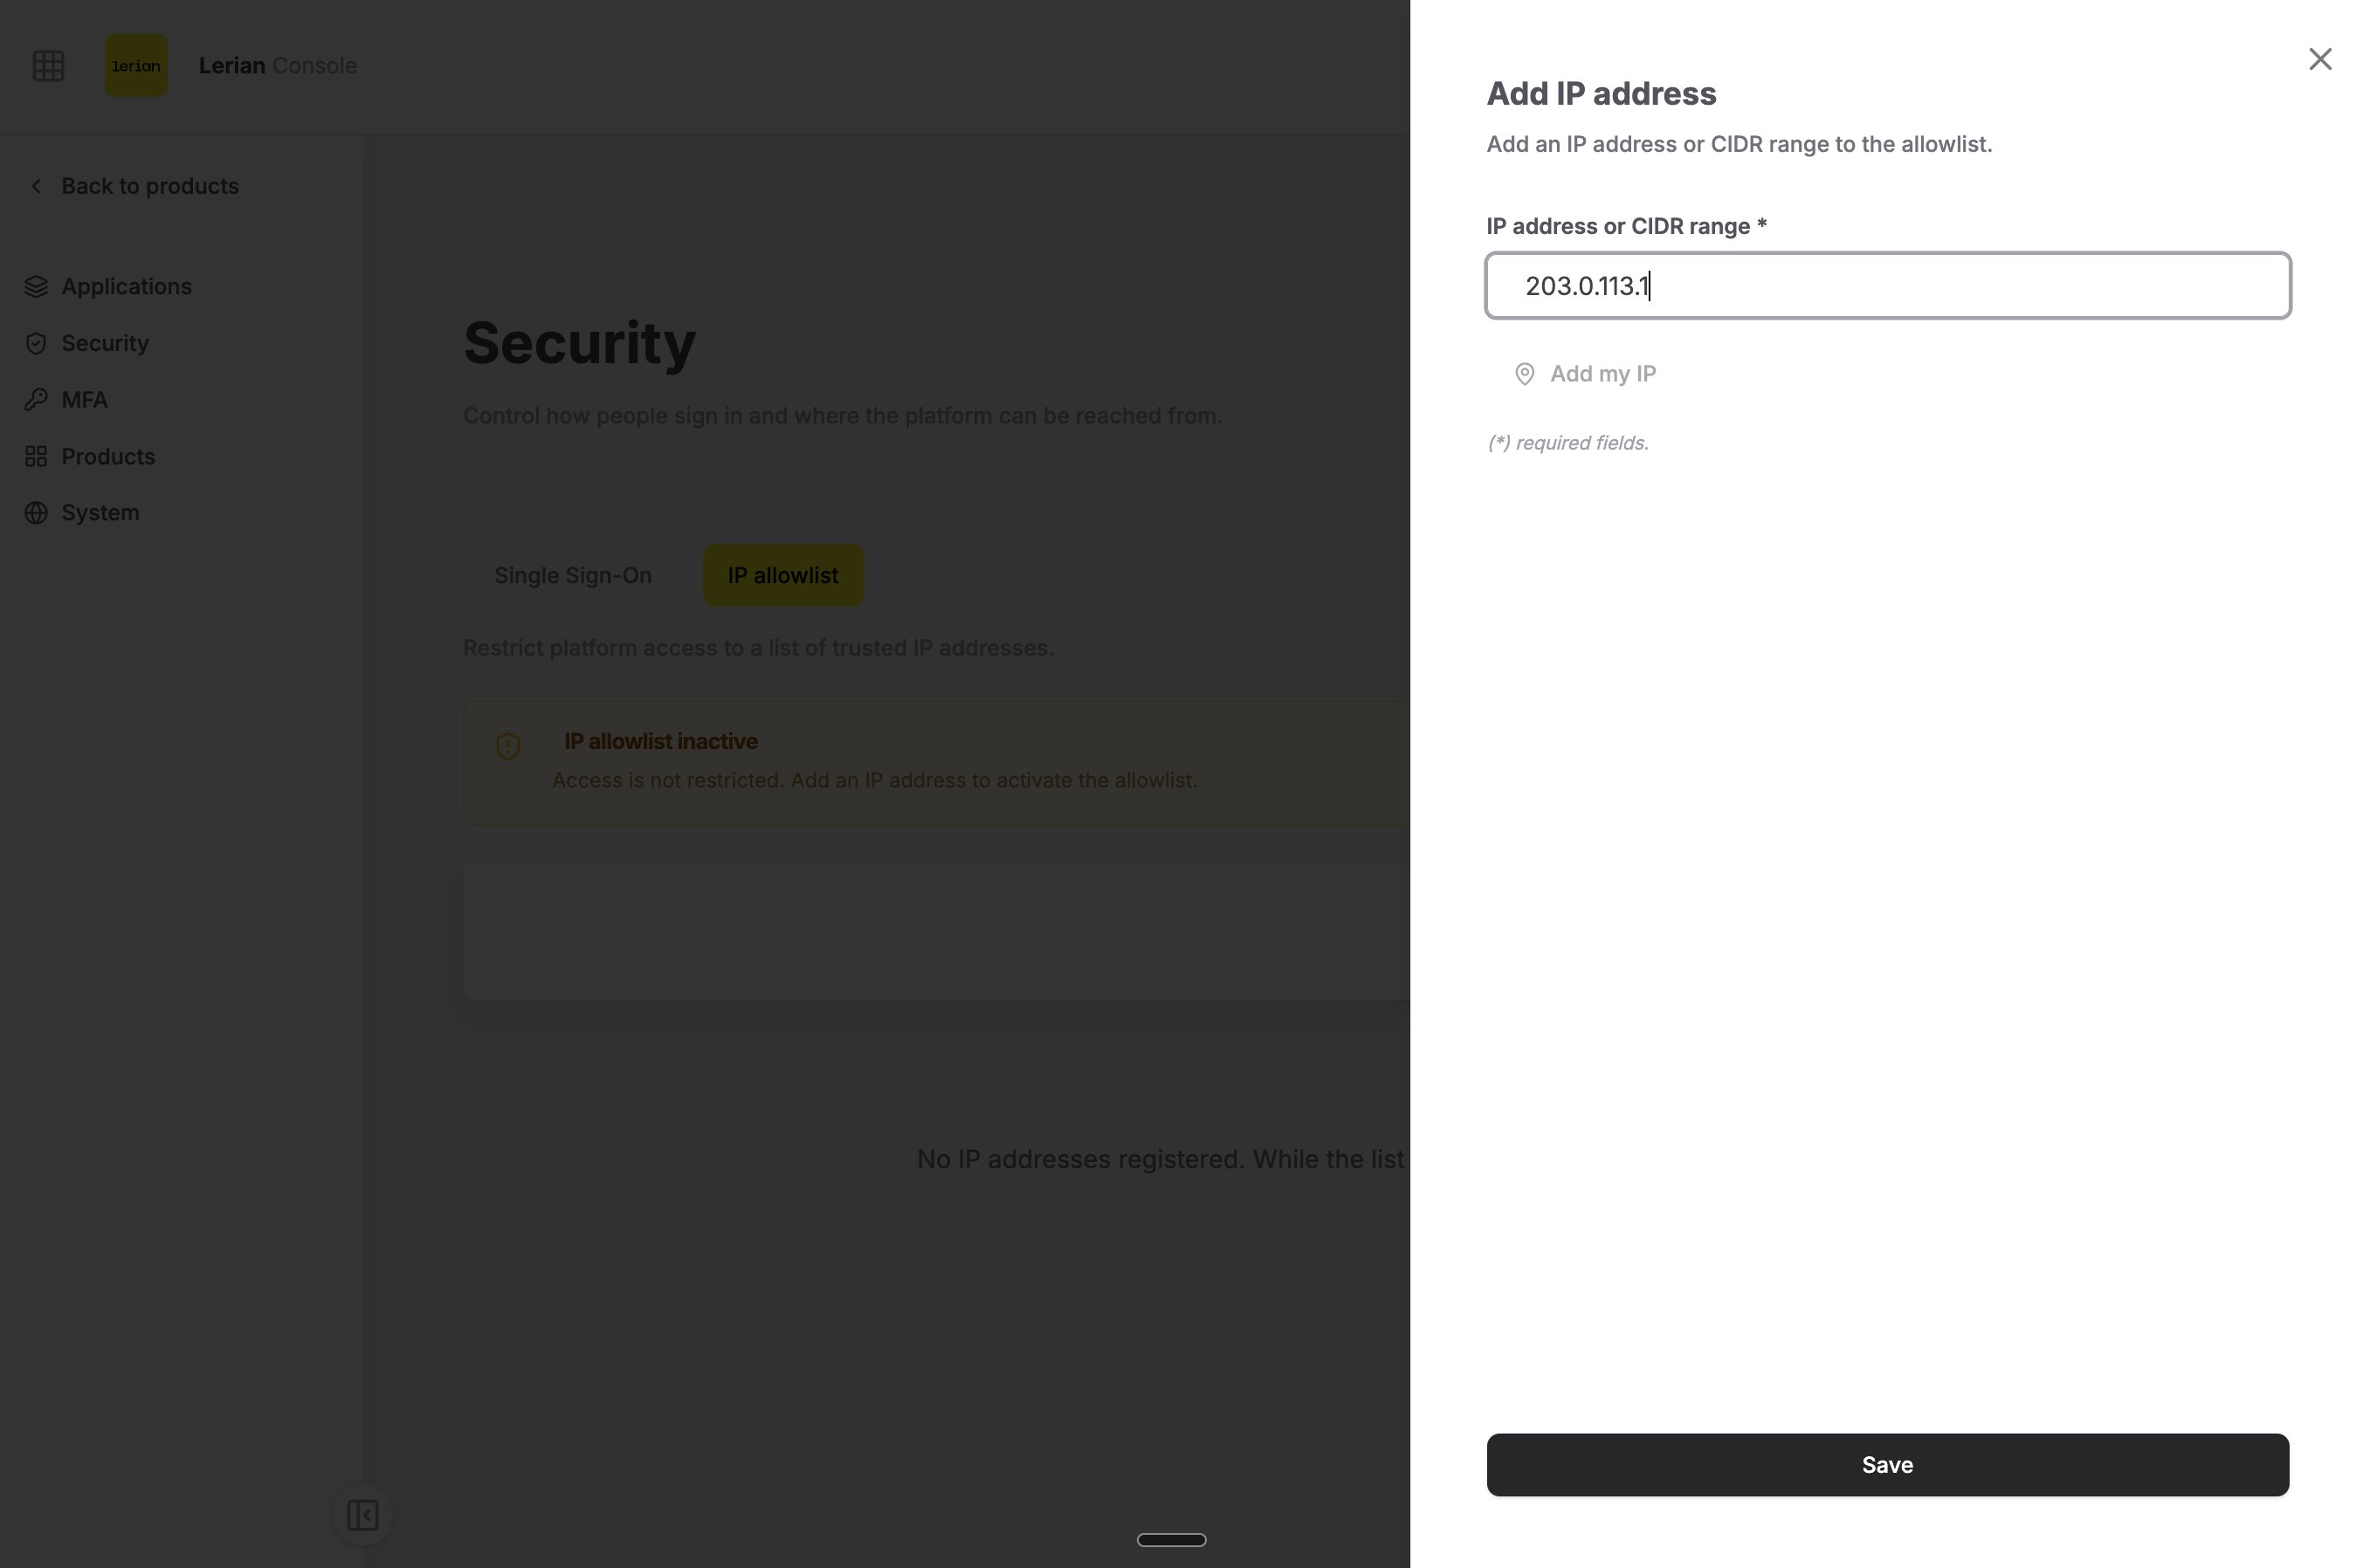
Click **Add IP**. The side sheet "Add IP address" opens with the description "Add an IP address or CIDR range to the allowlist."
Fill in **IP address or CIDR range**. The placeholder shows the accepted forms: `e.g. 203.0.113.5 or 203.0.113.0/24`.
To add your own address instead, click **Add my IP (your address)** inside the sheet.
Click **Save**. The Console validates the entry before it saves it.
## Read the page
***
The tab subtitle reads "Restrict platform access to a list of trusted IP addresses." A collapsible section, "What is the IP allowlist?", explains the feature in a few lines.
A status banner tells you whether the list is enforced right now:
| Banner | Color | Description shown |
| --------------------- | ----- | -------------------------------------------------------------------------------------------------------- |
| IP allowlist inactive | Amber | "Access is not restricted. Add an IP address to activate the allowlist." |
| IP allowlist inactive | Amber | "The list is saved but enforced nowhere — access is not restricted. Choose where it applies below." |
| IP allowlist active | Green | "Only the IP addresses below can sign in and use the console. API access is not restricted." |
| IP allowlist active | Green | "Only the IP addresses below can reach the API with your credentials. Console access is not restricted." |
| IP allowlist active | Green | "Only the IP addresses below can sign in to the console or reach the API with your credentials." |
Three buttons sit above the list:
* **Add my IP** adds the address you are connected from. When the Console cannot determine it, the button is disabled with the tooltip "Your IP address could not be determined."
* **Add IP** opens a side sheet where you type an address or a range.
* **Deactivate** appears only when the list has at least one entry.
## Add an address
***
Click **Add IP**. The side sheet "Add IP address" opens with the description "Add an IP address or CIDR range to the allowlist."
Fill in **IP address or CIDR range**. The placeholder shows the accepted forms: `e.g. 203.0.113.5 or 203.0.113.0/24`.
To add your own address instead, click **Add my IP (your address)** inside the sheet.
Click **Save**. The Console validates the entry before it saves it.
 The Console rejects two kinds of input:
* A value that is not an address or a CIDR range shows "Enter a valid IP address or CIDR range".
* A value already on the list shows "This entry is already in the list." `203.0.113.5` and `203.0.113.5/32` count as the same entry.
### When you add the first entry
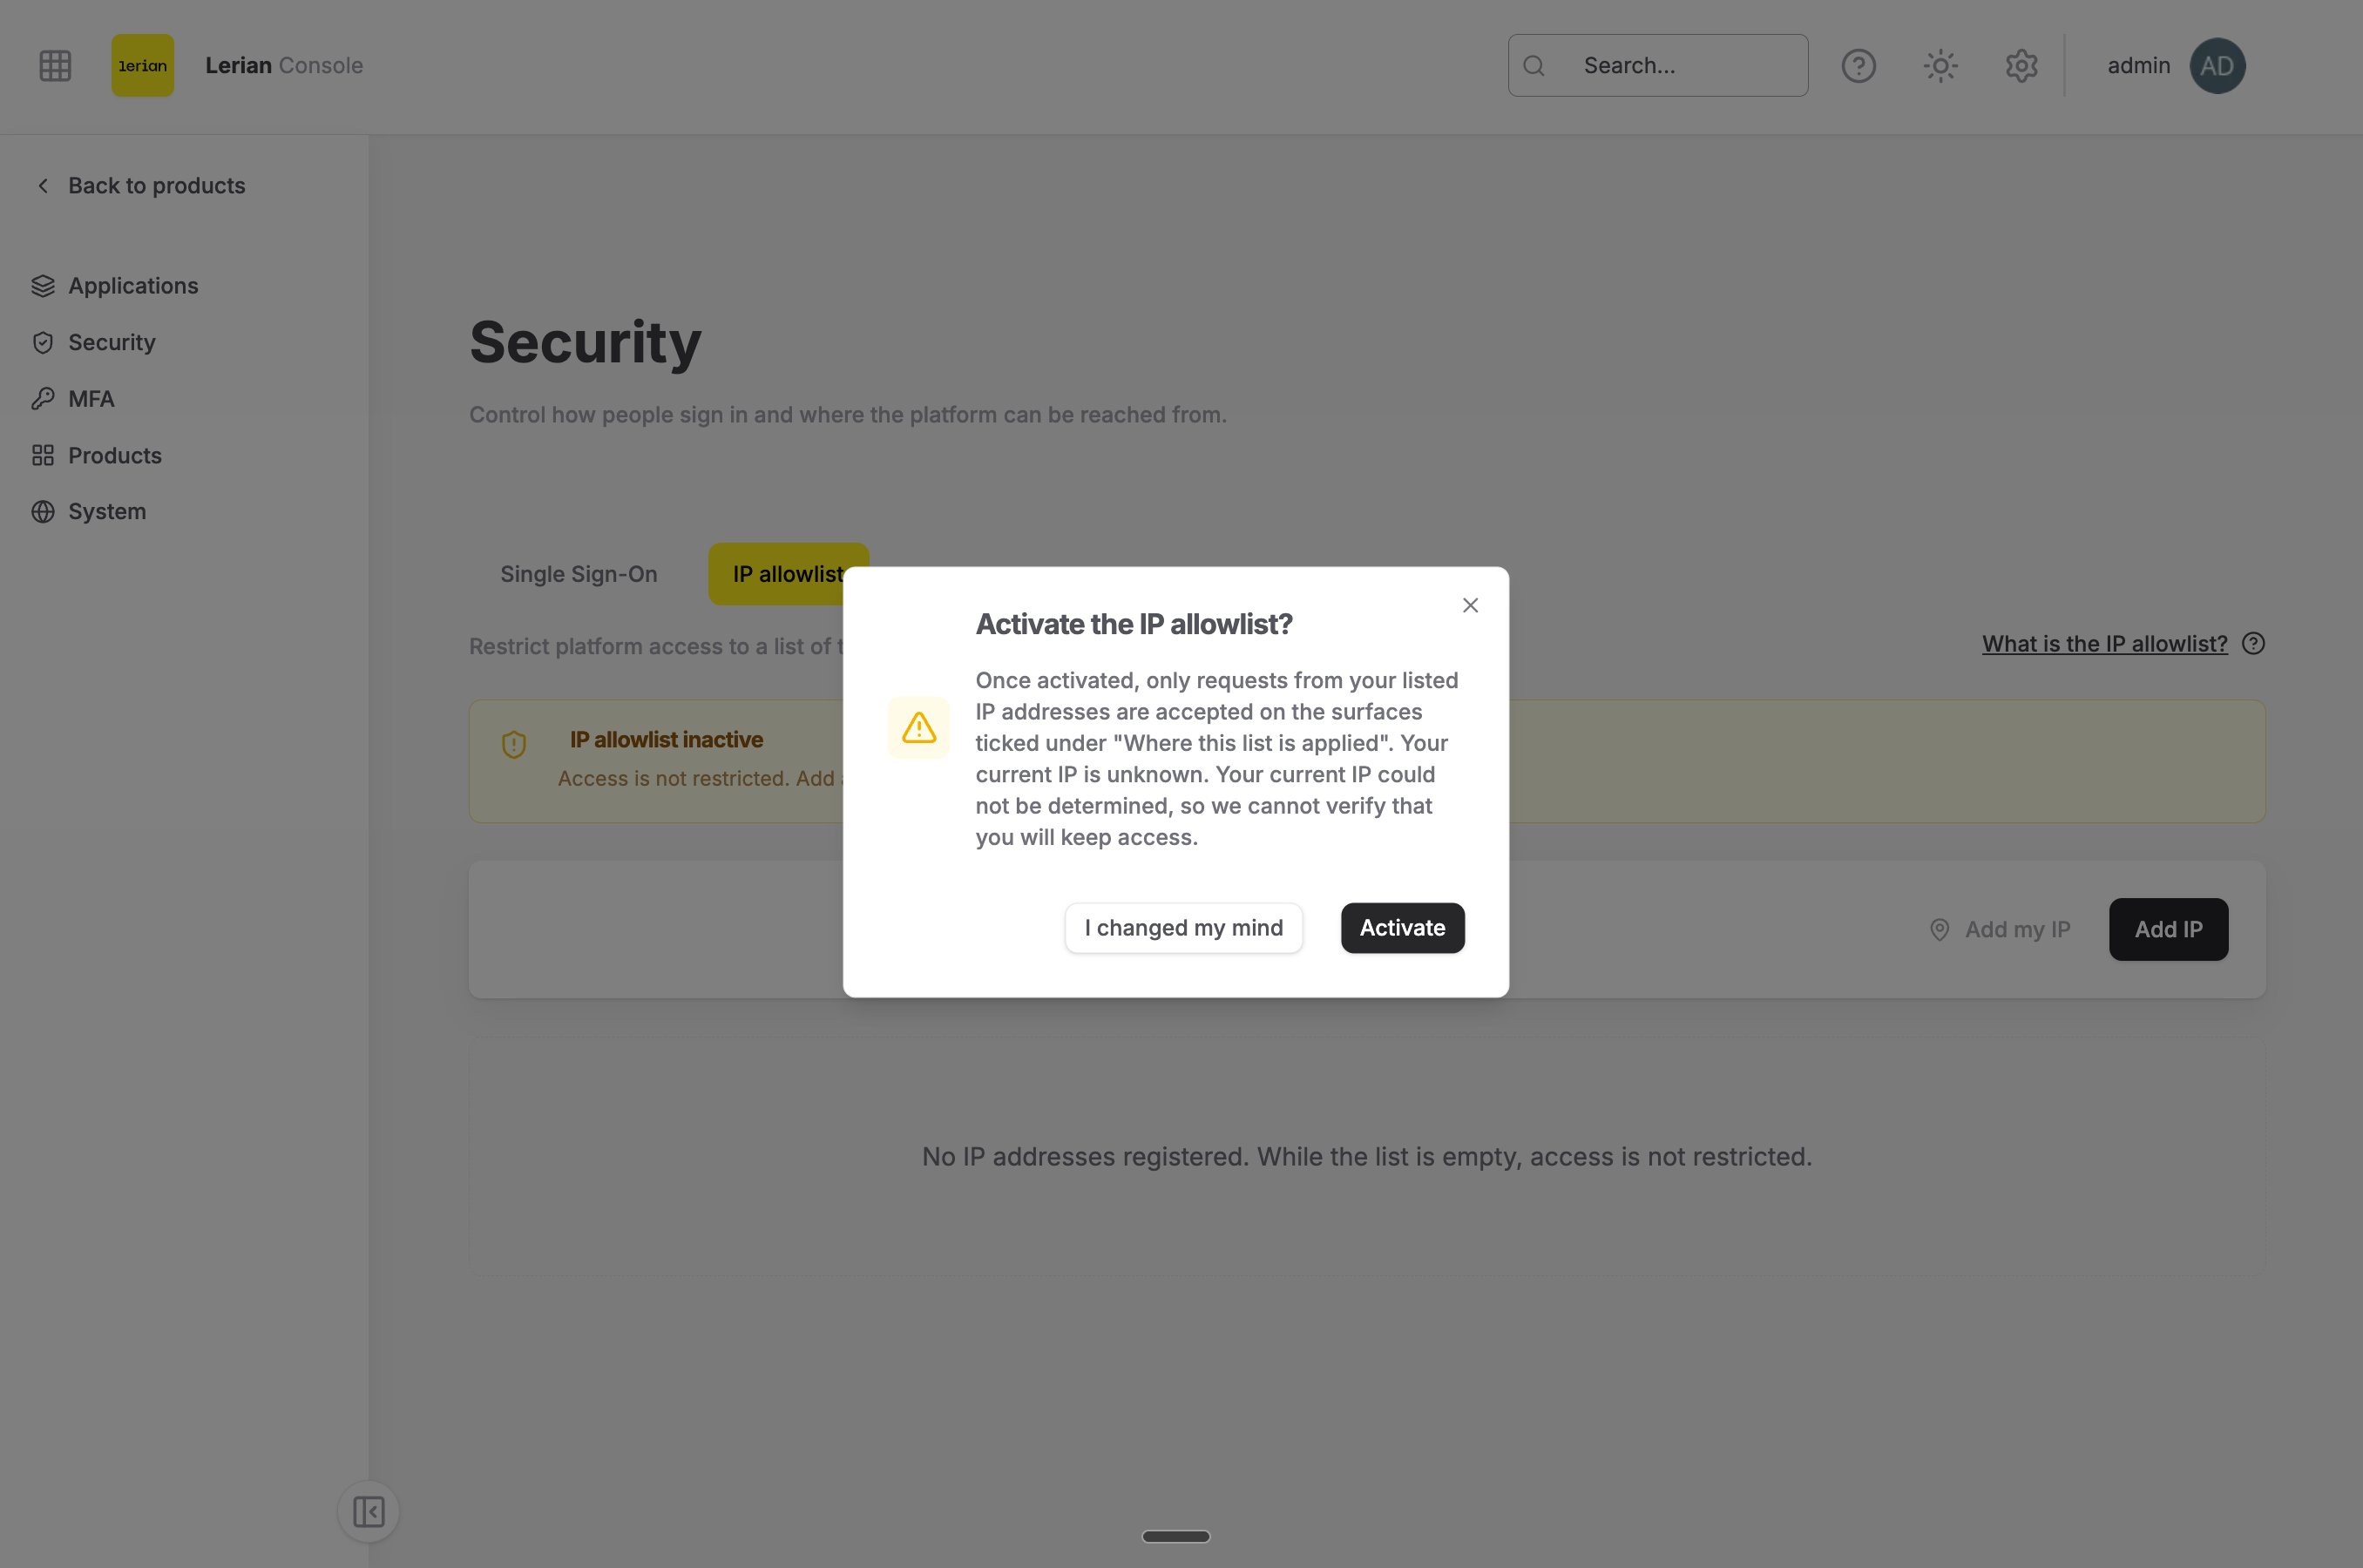
After you save the first entry, the list is enforced only when at least one checkbox under "Where this list is applied" is ticked. The Console asks you to confirm with the dialog "Activate the IP allowlist?". The text reads:
> Once activated, only requests from your listed IP addresses are accepted on the surfaces ticked under "Where this list is applied". Your current IP is `{ip}`.
Click **Activate** to continue or **I changed my mind** to go back.
The Console rejects two kinds of input:
* A value that is not an address or a CIDR range shows "Enter a valid IP address or CIDR range".
* A value already on the list shows "This entry is already in the list." `203.0.113.5` and `203.0.113.5/32` count as the same entry.
### When you add the first entry
After you save the first entry, the list is enforced only when at least one checkbox under "Where this list is applied" is ticked. The Console asks you to confirm with the dialog "Activate the IP allowlist?". The text reads:
> Once activated, only requests from your listed IP addresses are accepted on the surfaces ticked under "Where this list is applied". Your current IP is `{ip}`.
Click **Activate** to continue or **I changed my mind** to go back.
 ### When your own address is not on the list
If the address you connect from is not covered by the list you are about to save, the Console warns you. The dialog "Your IP is not in this list" reads:
> Your current IP `{ip}` is not covered by this list. If you save, you may lose access to this workspace.
Click **Save anyway** only if you are sure another listed address is under your control.
When the Console adds your address for you, it shows the notice "We also added your current IP (`{entry}`)". The notice explains why and how to delete the entry later.
### When your address is a private network address
If the Console sees you connect from a private network address, it tells you. The dialog "We see your access coming from `{ip}`, a private network address" explains that the address may belong to your VPN or a proxy.
Click **Include it anyway** to add it, or **Continue without including it** to leave it out.
## Choose where the list applies
***
The section "Where this list is applied:" appears below the table once the list has at least one entry. It holds two checkboxes:
* **Console access** — "only the addresses above can sign in and use the console".
* **API access** — "only the addresses above can use the API with your credentials".
The Console saves each change as soon as you tick or untick a checkbox.
### When your own address is not on the list
If the address you connect from is not covered by the list you are about to save, the Console warns you. The dialog "Your IP is not in this list" reads:
> Your current IP `{ip}` is not covered by this list. If you save, you may lose access to this workspace.
Click **Save anyway** only if you are sure another listed address is under your control.
When the Console adds your address for you, it shows the notice "We also added your current IP (`{entry}`)". The notice explains why and how to delete the entry later.
### When your address is a private network address
If the Console sees you connect from a private network address, it tells you. The dialog "We see your access coming from `{ip}`, a private network address" explains that the address may belong to your VPN or a proxy.
Click **Include it anyway** to add it, or **Continue without including it** to leave it out.
## Choose where the list applies
***
The section "Where this list is applied:" appears below the table once the list has at least one entry. It holds two checkboxes:
* **Console access** — "only the addresses above can sign in and use the console".
* **API access** — "only the addresses above can use the API with your credentials".
The Console saves each change as soon as you tick or untick a checkbox.
 ### Apply the list to API access
The first time you tick **API access**, the Console asks you to confirm. The dialog "Your integrations have to be on the list above" reads:
> Once this is on, any system calling the API with your credentials from an address that is not listed stops working immediately: webhooks, ERPs, scheduled jobs, application tokens. Those addresses are usually not the same ones you use to reach the console. Review the list before confirming.
Click **Apply to API access** to confirm.
### Apply the list to API access
The first time you tick **API access**, the Console asks you to confirm. The dialog "Your integrations have to be on the list above" reads:
> Once this is on, any system calling the API with your credentials from an address that is not listed stops working immediately: webhooks, ERPs, scheduled jobs, application tokens. Those addresses are usually not the same ones you use to reach the console. Review the list before confirming.
Click **Apply to API access** to confirm.
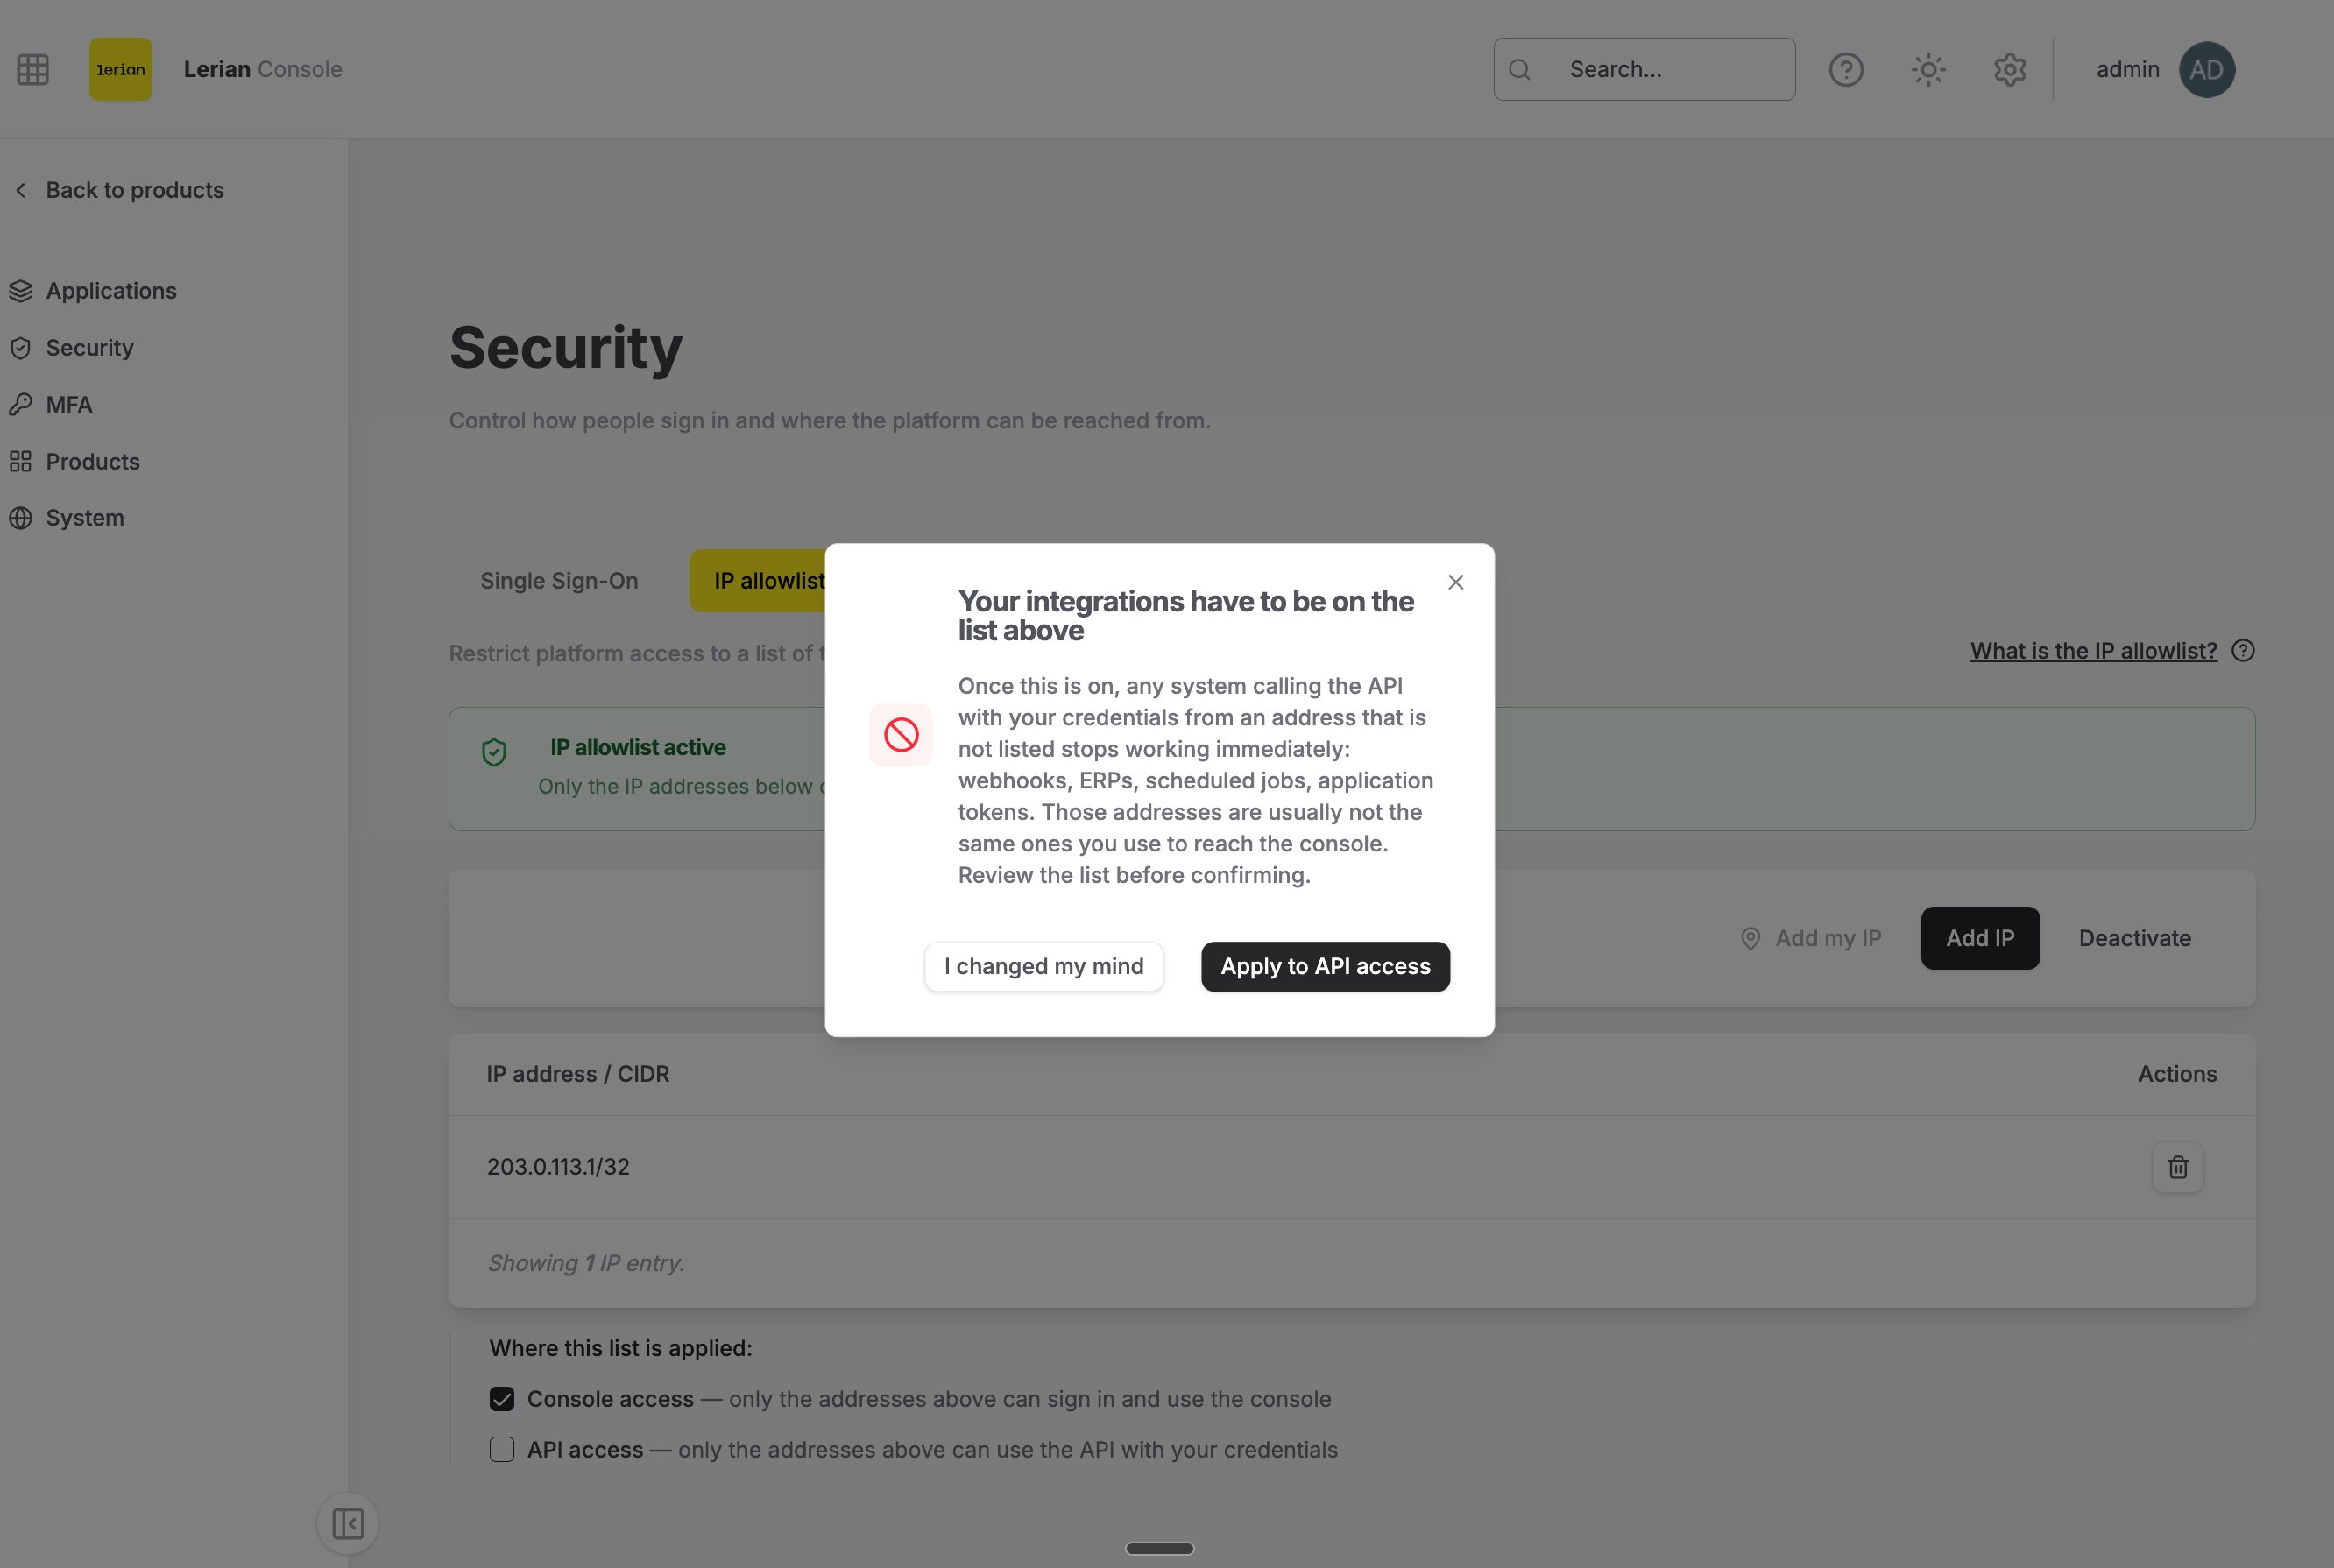 Do not tick **API access** until every integration's outgoing address is on the list. An integration that calls from an unlisted address stops at once.
### Untick both checkboxes
If you untick both checkboxes, the list stays saved but is enforced nowhere. The banner turns amber and reads "The list is saved but enforced nowhere — access is not restricted." Access is unrestricted until you tick a checkbox again.
## Delete an entry
***
Find the row in the table. The column is "IP address / CIDR". The footer reads "Showing N IP entries."
Click the trash icon ("Delete") on the row. The dialog "Remove this entry?" opens.
Read the text "Once removed, requests from this IP range will no longer be allowed." Click **Yes, remove it**.
Deleting the last entry deactivates the list, so the Console shows the deactivation dialog instead.
## Deactivate the list
***
Deactivation clears every entry and allows access from any address again.
Click **Deactivate** above the table.
The dialog "Deactivate the IP allowlist?" reads "This clears every entry and allows access from any IP address again." Click **Yes, deactivate**.
Do not tick **API access** until every integration's outgoing address is on the list. An integration that calls from an unlisted address stops at once.
### Untick both checkboxes
If you untick both checkboxes, the list stays saved but is enforced nowhere. The banner turns amber and reads "The list is saved but enforced nowhere — access is not restricted." Access is unrestricted until you tick a checkbox again.
## Delete an entry
***
Find the row in the table. The column is "IP address / CIDR". The footer reads "Showing N IP entries."
Click the trash icon ("Delete") on the row. The dialog "Remove this entry?" opens.
Read the text "Once removed, requests from this IP range will no longer be allowed." Click **Yes, remove it**.
Deleting the last entry deactivates the list, so the Console shows the deactivation dialog instead.
## Deactivate the list
***
Deactivation clears every entry and allows access from any address again.
Click **Deactivate** above the table.
The dialog "Deactivate the IP allowlist?" reads "This clears every entry and allows access from any IP address again." Click **Yes, deactivate**.
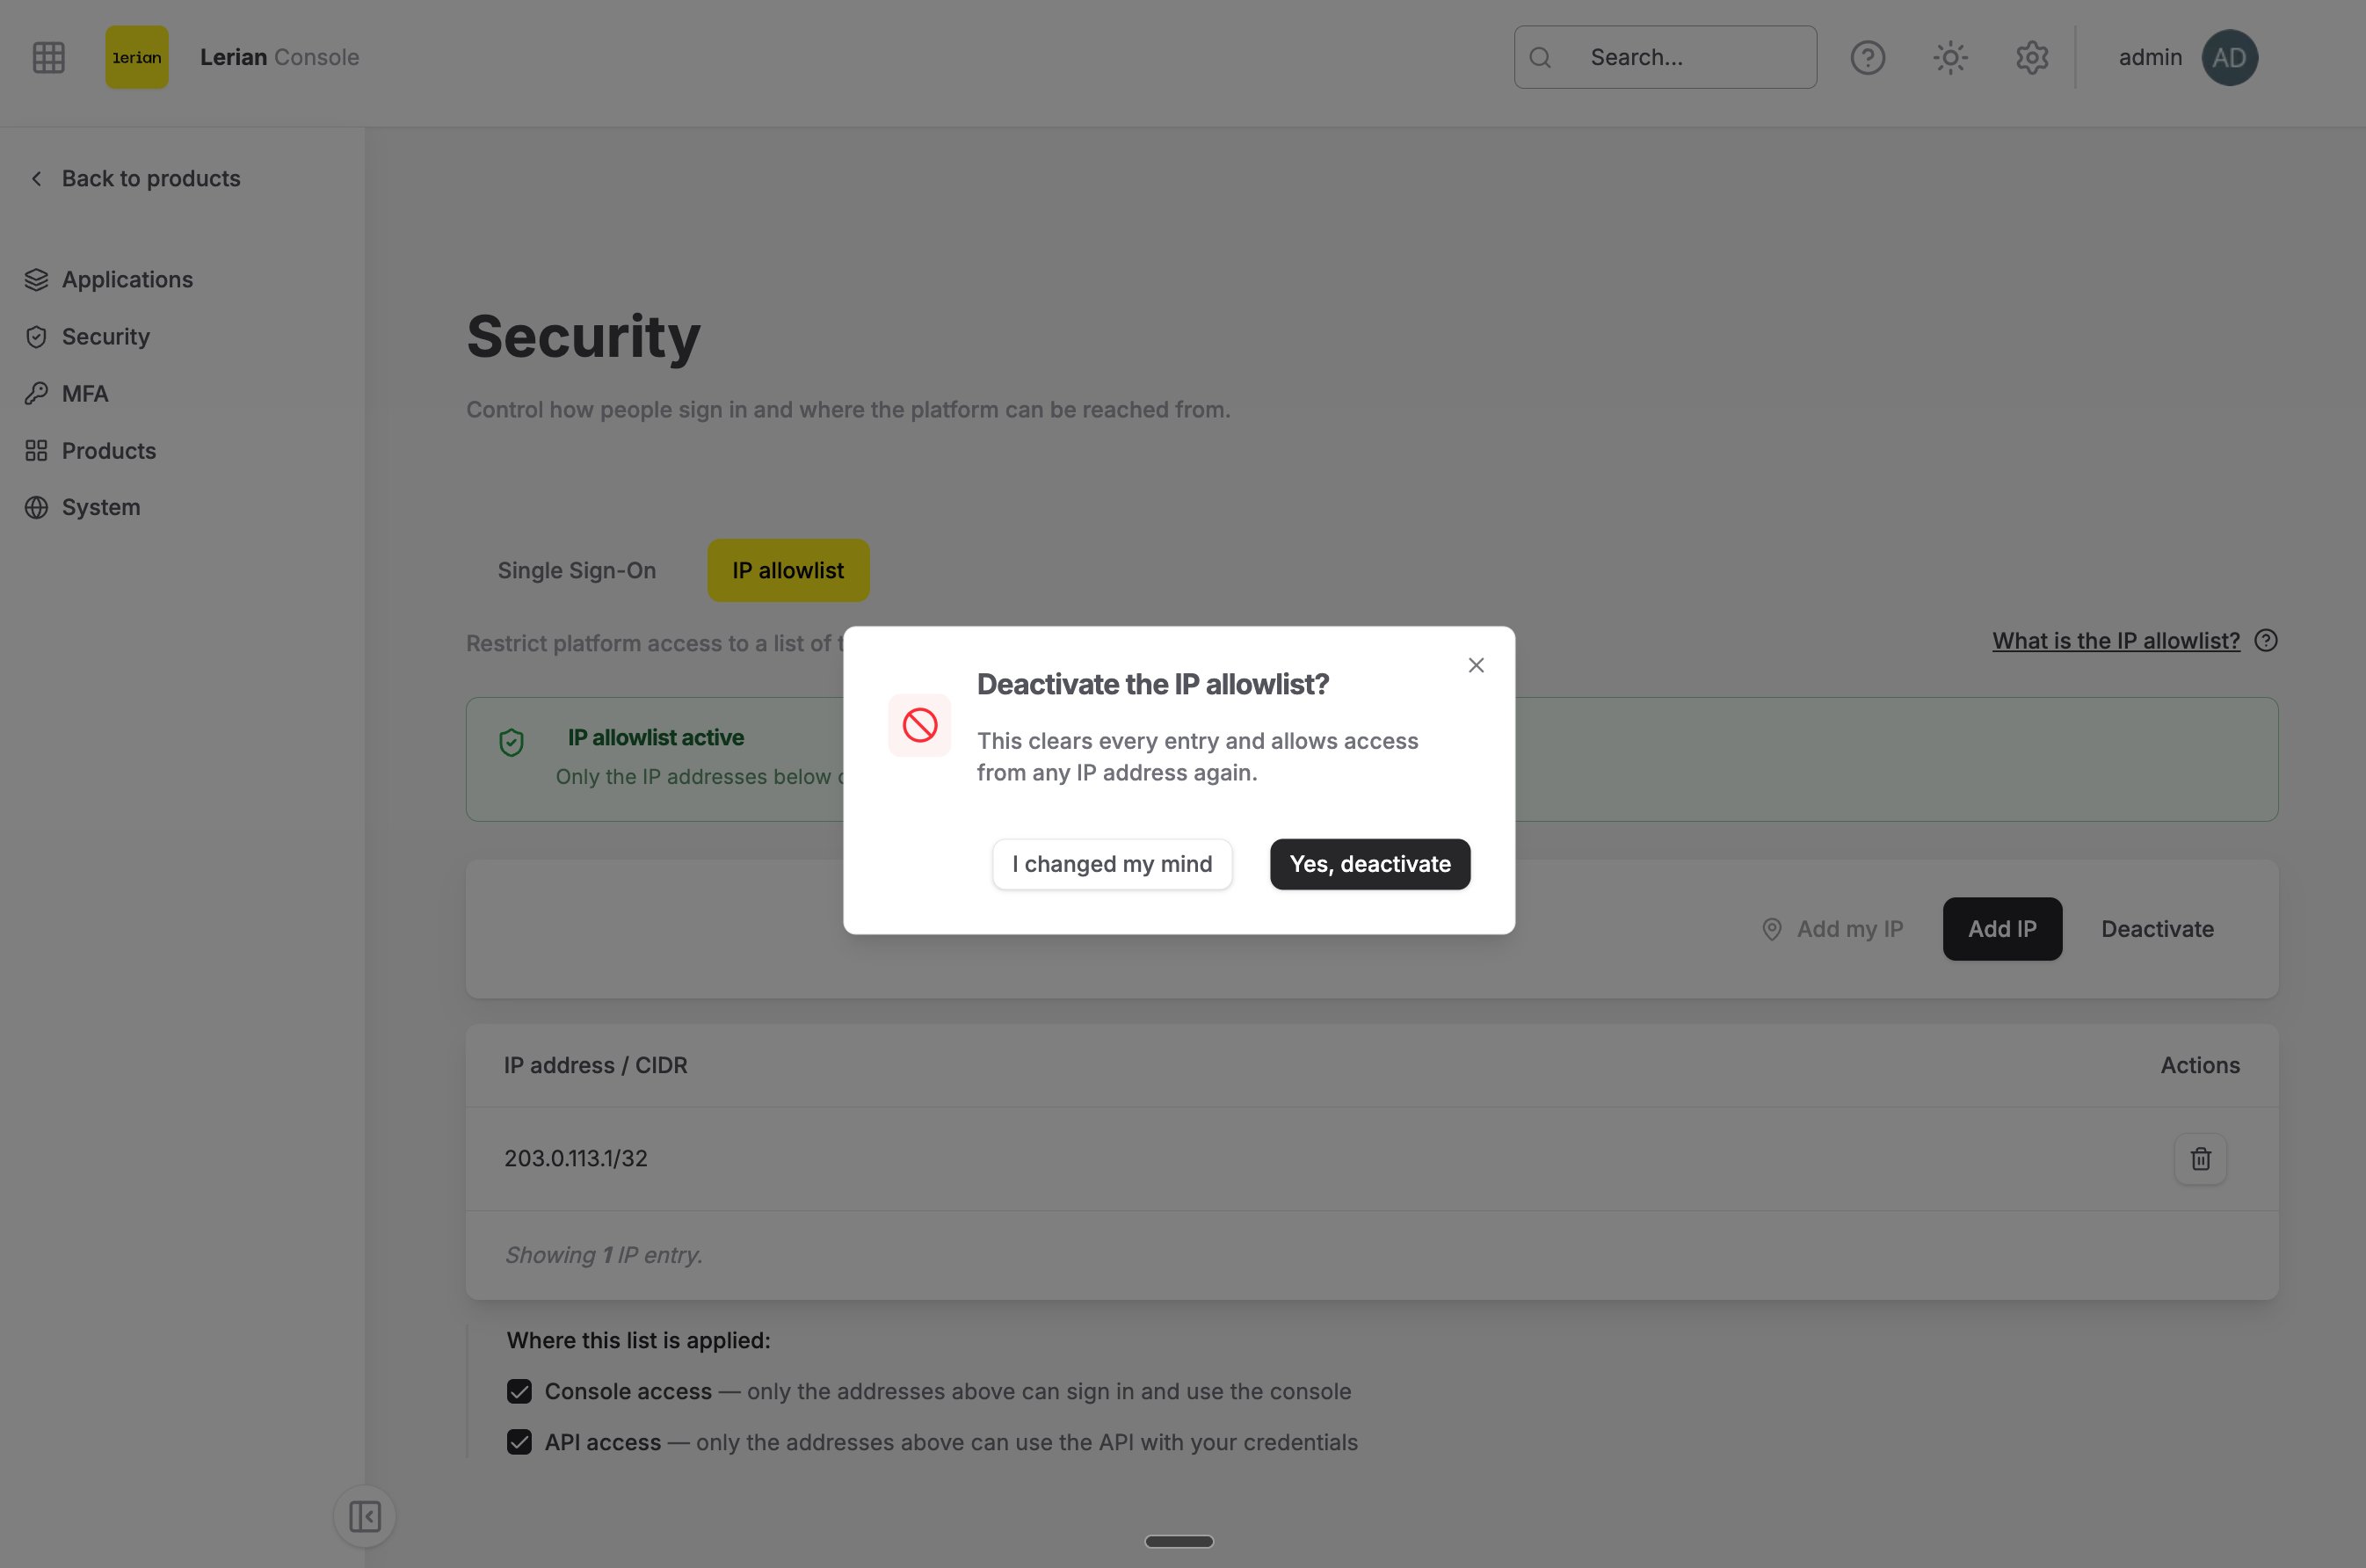 To pause the list without losing the entries, untick both checkboxes instead. The entries stay saved and you can apply them again later.
## Messages the Console shows
***
| Message | Meaning |
| ---------------------------------------------------------------- | ---------------------------------------------------------------------------------------- |
| "IP allowlist updated" | The change was saved. |
| "The allowlist is too large. Remove some entries and try again." | The list joined by commas exceeds 200 characters. Replace single addresses with a range. |
| "One of the entries is not a valid IP address or CIDR range." | The platform rejected an entry. Check each entry and try again. |
| "Could not update the IP allowlist. Please try again." | The platform did not answer. Try again, then contact your operator if it persists. |
## Related pages
***
What the feature protects, how it decides, and what it does not cover.
The same changes through two Identity API operations.
To pause the list without losing the entries, untick both checkboxes instead. The entries stay saved and you can apply them again later.
## Messages the Console shows
***
| Message | Meaning |
| ---------------------------------------------------------------- | ---------------------------------------------------------------------------------------- |
| "IP allowlist updated" | The change was saved. |
| "The allowlist is too large. Remove some entries and try again." | The list joined by commas exceeds 200 characters. Replace single addresses with a range. |
| "One of the entries is not a valid IP address or CIDR range." | The platform rejected an entry. Check each entry and try again. |
| "Could not update the IP allowlist. Please try again." | The platform did not answer. Try again, then contact your operator if it persists. |
## Related pages
***
What the feature protects, how it decides, and what it does not cover.
The same changes through two Identity API operations.